Sunday, March 31, 2013

The Bear Grylls Ultimate Survival Knife

I bought this knife. I received no compensation for writing this review.
I have avoided reviewing any Bear Grylls survival gear. I think Bear does crazy, foolhardy things on his show in the name of entertainment and sensationalism, and that somebody will die or get seriously injured following his example.
by Leon Pantenburg
But somebody is buying his line of survival products. In 2011 the Ultimate was the best-selling knife in the world. Gerber now makes the Ultimate Knife with a fine-edge from the top of the handle to the tip of the blade. There were some issues with the first series that came out two years ago, but the upgraded Ultimate model has apparently dealt with them.
bear grylls ultimate knife
The Bear Grylls Ultimate survival Knife
I have received several requests asking for opinions about the new knife. So here we go.
On first blush, the knife has some features I like, such as the full-tang, five-inch drop point blade, a soft, easy to grip handle, and a ferrocerrium rod that fits in the sheath. It has a bright orange trim on the handle, which is important on a survival knife. People concerned with concealment can always cover the orange with camouflage duct tape.
Knife Features:
  • High Carbon Stainless Steel Drop Point Blade. Gone are the serrations. People either love or hate serrated edges, and I hate them. IMO, serrations are a specialty edge that most people won't need or use. When they dull, sharpening serrations takes skill and a specialized tool.
    • Ergonomic Textured Rubber Grip - Maximizes comfort and reduces slippage. Thanks goodness, there was no hollow handle full of junk! A non-slip handle is a requirement for a knife that will be used in hunting or survival situations. Dress out a big game animal, and you will inevitably get blood and other fluids on the handle. If your hand slips onto the blade, it could be really, really bad.
    • Stainless Steel Pommel - At base of handle for hammering. In some 40 years of kicking around the backcounty, I have never had occasion to pound on something with the pommel of a knife. Pick up a rock or stick to do any hammering. Don't risk your knife.
    • Emergency Whistle - Integrated into lanyard cord. This is loud and handy, as it should be. I always carry a couple of whistles, and this feature is valuable.
    • Sheath Features:
      • Fire Starter - Ferrocerium rod locks into sheath, striker notch incorporated into back of knife blade. This is a good addition to any survival knife system.
      • Nylon Sheath - Lightweight, military-grade, mildew resistant.
      • Land to air rescue instructions - These are things you should learn or already know. Having a reminder along on the back of the sheath is not a bad idea.
      • Diamond Sharpener - Integrated into sheath for on-the-go sharpening.
      • Priorities of Survival - Pocket guide contains Bear’s survival essentials.
      My standards for knife evaluation are based on use, not abuse. Try hard enough and you can break anything, and I’m not sure what that necessarily proves. So essentially, all the knives I evaluate start out in the kitchen. They are used at every opportunity, to see how the blade works for different common tasks. Also, I’ll find some lengthy cutting job, such as slicing prime rib thin, to test the handle design. The Ultimate came out of the box sharp enough to shave hair.
    So the testing began.
    I chopped some carrots and cut up and disjointed a chicken, and sliced some steak. No problem, and it held its edge. The handle is comfortable and non-slip. Then I cut up some corrugated cardboard, one of the most abrasive and knife-dulling materials imaginable. The edge held up OK. I cut the cardboard until the blade lost its razor edge, then touched it up with a butcher's steel. A few swipes restored the blade to its former sharpness.
    Next, I whittled on a hard, old pine stick until the knife started to get hard to use. It didn't take long for the edge to lose its sharpness. IMO, it dulled too easily, which would indicate an inferior or too-soft steel.
Then I tried the ferrocerium rod with the specially-ground part of the blade. Ignition sparks were quick and sure. The ferro rod is top quality, and it throws a hot spark.
There is a diamond sharpener on the back of the sheath. It works fine, but most people probably don't have the skill to use such a sharpener.
I didn't like the sheath. The carrying loops on the back are too small for most belts, and it doesn't look particularly sturdy. The plastic part of the sheath appeared well-designed - all it needs is a better holder or platform.
This custom Grenfell hollow handle survival knife is well-designed and effective.
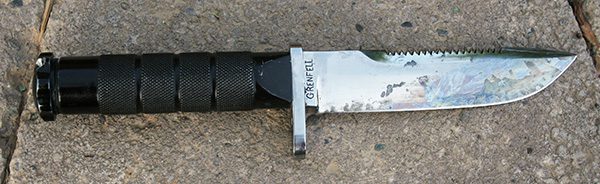
I designed this prototype Jim Grenfell hollow handle survival knife. It has a five-inch drop point blade. (Pantenburg photo)
Survival instructions: These are a collection of myths and misinformation. Some of the skills shown are way beyond a beginner to imtermediate's skill levels, and trying to learn and implement some of them during a survival situation is a recipe for disaster.
Overall, I'm lukewarm about this knife. It relies too heavily on Bear Gryll's celebrity and too little on sound design and quality. While it's not a bad knife, it is just not a very good knife or something I would stake my safety on.
I won't buy another Ultimate. But I would suggest this to Gerber: Take your knife design, leave the handle as it is, and put some good steel in the blade. Keep the plastic part of the sheath, with the ferro rod, and attach it to a better platform that allows for comfortable carry. Get rid of the diamond sharpener.
Stay with Bear for the PR and advertising aspect - he is fooling millions of people with his survival shenanigans and you are benefiting too. But dump the "Priorites of Survival" tips and get an expert, such as Peter Kummerfeldt, to write something practical.
Do some tweaking - then you will have a quality product you can be proud of.


(Check out "The Best Survival Knife?" blog by clicking here!)

Sunday, December 30, 2012

Video: Include a stocking cap in your survival gear

About 10 percent of your body heat exits through your head. Conversely, sun beating down on an unprotected head can cause sunstroke, headaches and severe sunburn. A stocking cap may be what you need to handle both of these circumstances.
by Leon Pantenburg
Check out this survival LED light for a keychain!
Check out this light!

Balding, middle-aged men like me develop a real affection for hats that work well. I always wear some sort of head covering outdoors, and generally it will be some sort of broad-brimmed type.
But I also carry a stocking cap in my survival gear. A stocking hat, by way of (my) definition, is a loose knit, form-fitting cap, made of natural or synthetic fibers. The proper stocking hat can handle two vastly different scenarios.
Check out the video below!

The correct style and material can determine if your stocking cap will be useful in specific situations. From left is a beanie, heavy wool/thinsulite winter cap, and a full-face knit reversible selection. (Pantenburg photo)

Heat:
Mississippi has got to be one of the most hot, humid places anywhere during the summer months. At least it is, when you're wearing a wool uniform.
One summer, I was a Volunteer in the Park at Vicksburg National Military Park. I dressed in authentic Civil War clothing, and was part of a cannon crew that fired a 12-pound Napoleon for tourists. Also, as a Vicksburg Post staff reporter, I was drafted and "embedded" into a Confederate infantry unit at a couple of local re-enactments. (I protested vigorously, in the tradition of all conscripts, and pointed out the perfidy of the southern cause. At one point, I refused to stand and sing "Dixie" along with the other re-enactors. For this transgression, I was tied to a cannon in front of the Old Court House Museum as an example to other malcontents.)
At one of these living history events, I noticed a soldier wearing a stocking cap, drilling in the hot Mississippi sun. He claimed it kept him cool.
"It's cotton, and hand-knit by my sister," he told me. "I soak it in water before we hit the field, and the evaporation keeps me cool."
For improved sun protection, he sometimes wore a broad-brimmed straw planter's hat over the wet cap. The stocking cap provided insulation from the tropical sun and a source of water for evaporation. The straw hat shaded his head, face and neck. All his modern sun protection needs were taken care of very effectively by old-time technology.
This is a technique that can be adapted to your desert or hot weather hiking with a cotton stocking cap. The cap will be warm at night until it gets wet. In the daytime, soak it in water to help cool your head. This cap (unless it's a beanie) can also be pulled down over your eyes, ears, nose and neck for sun protection. A cotton bandana can also be put into service in a similar manner.
Cold: People think of thick, wool caps when they think of winter wear. I do.
One of my favorite hunting caps is a reversible camouflage/blaze orange synthetic ski-mask. I seldom pull the cap down over my face, but I know the option is there. When big game hunting, I wear the orange side out. When after waterfowl, the camo is used. In those instances, the face covering may be used to help hide my face.
A stocking cap is great to wear for stalking through deep woods, or when there is a lot of bush to go through.
Leon Pantenburg is the author of SurvivalCommonSense.com
I prefer a broad-brimmed wood hat for most of my outdoors wear, but also carry a stocking hat as a backup.
My collection of stocking caps range from light to heavy. I may start out wearing a stocking cap, and then layer another on top if weather conditions call for it.
Despite the versatility of this head covering, there are a few things to consider before buying one.
    • Material: Don't buy a cotton cap for cold weather or a wool one for heat. The material of the cap will help determine when it should be used, and you don't want to get them mixed up. Wool stays warm when wet, which makes it a bad choice for dealing with the heat.
    • Weave: A tight-knit hat will tend to be warm, and a loose construction will allow heat to dissipate quicker. Don't get a loose weave cap for warmth.
    • Size: A beanie is typically not large enough to cover your face and nose if needed. Conversely, a large hat may be bulky and too hot.
Follow Me on Pinterest

Sign up for our Email Newsletter

Paracord: You can't get along without it

Among the many survival tips I have learned from Peter Kummerfeldt is to always carry paracord as part of my emergency gear. I have used it for everything imaginable, and you will too!

by Peter Kummerfeldt
550 cord, paraline, paracord,  parachute line, call it what you will, 150 feet of mil-spec parachute line should be a part of your gear. (Peter Kummerfeldt photos)
550 cord, paraline, paracord, parachute line, call it what you will, 150 feet of mil-spec parachute line should be a part of your gear. (Peter Kummerfeldt photos)

As I think back over nearly 46 years of teaching survival skills and about the same amount of time beating about the bush, I don't think I have ever been without some parachute cord. I have used to to build shelters, catch fish, weave nets, make stronger rope, for emergency dental floss, as sewing thread, to retrieve water when I was cliff-bound and yes, parachute line has lowered me to the ground when I jumped out of an airplane while I was in the Air Force. Simply put it can truly be a life saver!


Paracord is made of several fibers, which gives it a strong tensile strength.
Paracord is made of several nylon fibers, which gives it a strong tensile strength.


What is parachute line? Parachute line is made up of a tubular case containing seven pieces of thinner, nylon threads each of which can be further separated into three even finer threads.


Each fiber has about 7-8 pounds of strength.
Each fiber has about 35 pounds of strength.
The tensile strength of a piece of line is 550 lbs. The tensile strength of one piece of the inner thread is about 35 lbs. I don't know what the tensile strength of the very smallest fibers is - probably around 8 or 9 lbs. At this point the material is useful as a dental floss substitute, sewing thread, fishing line and even suture material.


Make sure you can see your paracord.
You can buy parachute line in just about any color from many internet vendors or sporting goods stores. Or you can go to your local military surplus store where the predominant colors are white or OD green.
I recommend buying white cord and then dying it bright red or orange so that you can find it if you drop the line on the ground or worse still, on snow.
 RIT fabric dye works well. Make a concentrated solution and then drop your parachute line into it and leave it there until you are happy with the color. Before you remove it from the dye pour in a cup of vinegar to set the dye and let it sit some more - a couple of days. If you don't do this, since nylon doesn't take up dye very well, the dye will come off in your hands.

Twisted paracord makes a stronger rope.

Stronger rope can be made from parachute line by either twisting two ropes together or by braiding three or more pieces together.

As I said in the beginning, 150 feet in 25 foot lengths, should be included in your gear. There's no way to improvise a line from natural resources that comes close to the strength, utility and usefulness of parachute line. Check out this paracord.


Peter Kummerfeldt has walked the talk in the wilderness survival field for decades.
Peter grew up in Kenya, East Africa and came to America in 1965 and joined the U.S. Air Force. He is a graduate of the Air Force Survival Instructor Training School and has served as an instructor at the Basic Survival School, Spokane, Washington; the Arctic Survival School, Fairbanks, Alaska, and the Jungle Survival School, Republic of the Philippines.
Peter Kummerfeldt has taught wilderness and urban survival for four decades.
Peter Kummerfeldt

For twelve years, Peter was the Survival Training Director at the United States Air Force Academy, Colorado Springs, Colorado. He retired from the Air Force in 1995 after 30 years of service.
In 1992, concerned with the number of accidents that were occurring in the outdoors annually and the number of tourists traveling overseas who were involved in unpleasant and sometimes life-threatening incidents Peter created
He is the author of “Surviving a Wilderness Emergency” and has addressed over 20,000 people as the featured speaker at numerous seminars, conferences and national conventions.
Check out Peter’s blog at: OutdoorSafe.blogspot.com

‘Don’t Die Out There!’ wilderness survival playing cards

These playing cared with wilderness survival information on them can be a useful and valuable emergency preparedness tool. (Pantenburg photo)
These playing cards with wilderness survival information on them can be a useful and valuable emergency preparedness tool.
A deck of playing cards can be a great way to deal with down time and can provide entertainment in camp. These cards, with survival information on them, may also fill a survival need.
by Leon Pantenburg
People try to send me junk. Often, manufacturers want me to do a free, favorable review in return for some piece of merchandise they want promoted. Generally, I don't waste my time. I have all the free stuff I'll ever need, with the exception of custom Mora-style rigid bladed knives.
Check out this knife!
So when my hiking partner of over 40 years, John Nerness, of Los Gatos, CA, sent me a deck of wilderness survival playing cards, I figured it to be a joke.
John and I, by way of introduction, started hiking and canoeing together as teenagers. Our latest trip was a dayhike to the Cascades' Green Lakes area in 2011. On excursions as varied at hiking Death Valley, CA, to a canoe voyage through the Okeefenokee Swamp in Georgia, we refined our outdoor gear. A deck of cards always went along, and we have a decades-old Four Point Pitch game ongoing.
This game has been played under a tarp in the rain, while we waited for a mountain pass to clear; inside a tent while it snowed outside; around a campfire; in a Death Valley ghost town; on a sleety, windy day with a canoe providing a windbreak, and on numerous campground picnic tables and flat rocks.
And until I chatted with John recently, I hadn't though about the fact that some entertainment items could be considered survival items. Here are some thoughts:
  • Because we didn't get bored, we didn't attempt to push up over that mountain pass in hazardous weather. We could sit out long periods of in climate weather.
  • Nobody got cabin fever sitting in the tent in the rain.
  • There is inevitable down time in the wilderness sometimes, and a fun game can make the experience better.
The first thing I did was spread out the cards and check out the information. Produced by the Mountaineers Books in Seattle, I was favorably impressed by several categories. Diamonds are survival essentials; Spades are assessing your situation, water, fire and food; Hearts are basic first aid and Clubs are CPR, head and spine injuries and evacuating the injured.
The first aid was excellent, and there were several fine diagrams on splinting limbs. Firemaking was good, and the rest of the deck is composed of sound information. The cards would make good reading if you didn't want to play them.
The only complaint I had was about the two cards dedicated to building a solar still.
Solar stills don't work. Don't waste time with them. I am incredulous that the Mountaineers let that one slip by. I drew a large "X" across the face of the solar still cards, which doesn't affect their playability.
So do you need a wilderness survival card deck in your preparedness gear? Maybe.
  • If you're lost, staying put is the first order of business. Take care of whatever survival chores need to be done. Then just wait. If you're alone, play solitaire. If you're with others, get some game going that will keep them from being bored and take their minds off the situation. You may have to wait a long time to be rescued, and anything that can make that wait easier is a good thing.
  • The cards are a valuable source of information: Know what you're doing before heading off-pavement, and don't plan on using a manual for on-the-job training. But what if you are the person injured, and you only have newcomers to assist you? It would be easy to pull out the signalling card, and direct them to make some aircraft attractors in the nearby clearing. Likewise, you probably don't want to walk someone through all the steps of splinting your broken ankle!
  • Morale is an important part of any activity. If you have a deck of cards, a tournament can be organized among a group of disaster survivors that will encourage bonding and interaction.
Since John and I usually have cards along, we'll probably include a deck of Wilderness Survival cards next outing. The cards would make a great gift for the outdoorsman. (To order your deck, contact the Mountaineers Books.)

Follow Me on Pinterest

Sign up for our Email Newsletter

Tuesday, November 27, 2012

The Kelly Kettle: A great way to boil water

I was not paid to do this gear review.
Purifying water can be critical during an emergency. The Kelly Kettle combines an efficient design for boiling water with the ability to be fueled with biomass. It seemed like a great idea, so I ordered one for testing.
by Leon Pantenburg

In the aftermath of a disaster, finding pure water can be very, very difficult. Boiling may be the only practical method of purifying large amounts of it.
The Kelly Kettle is a simple, effective tools for boiling water fast.
The Kelly Kettle is a simple, effective biomass-fueled container designed to boil water fast.

This leads to another potential problem: What will you use for fuel to create the heat source? I am a huge fan of biomass-fueled emergency stoves, so I was intrigued with the Kelly Kettle concept.
According to the parent company, the Kelly Kettle is a 100-year-old design that originated in Ireland. The tradition of using the kettle to boil water at lunchtime goes back to the 1890s on the west coast of Ireland and the design has changed little. The idea was to produce an easy-to-use, compact biomass-fueled vessel for boiling water.
Lough Conn is famous for its free rising brown trout and fresh run Salmon from the River Moy system. The lake provided (and still provides) ample fuel for use in the kettle, according to the website, where washed up twigs, sticks and dried grass were easily available. On wet and stormy days, the local angling guides would keep watch for the small pillar of smoke on the lake shore which indicated that a colleague already had a "brew" on! A hot cup of tea or soup awaited anyone who landed and the Kettle would be repeatedly boiled as additional boats laden with anglers arrived.
It seemed to me that such a kettle would have a valuable place in my emergency preparedness supplies, as well as being really useful for backpacking. I ordered the Kelly Base Camp Aluminum Kettle, which holds 54 ounces of water and weighs 2.1 pounds. My reasoning was that a kettle this size, if it worked as advertised, would be ideal for base and hunting camps and could supply several people with hot water quickly during emergency situations. Most importantly, it would never run out of fuel.
My first impression upon opening the box was that the kettle design is extremely well thought out and practical: A double-walled metal container, hollow in the middle, fits on a base that allows building a fire. The design creates a chimney effect, which makes for effective fuel use and rapid heating.
The workmanship and quality is great - I filled it with water and headed outside.
As is my wont, I test survival products in whatever circumstances are outside. In this case, the weather in Central Oregon was cold and damp, it had been raining for several days, and all the twigs and sticks were wet or damp. Starting them was not a problem and once the fire got going, the water boiled after about three to five minutes.
I was surprised at how rapidly the kettle worked, and with so little fuel. I had picked up a big handful of damp sticks off the damp forest floor, and didn't need all of them to boil the water.
There are accessories, a Pot-Support and Cook Set, that can be added to a Kelly Kettle to allow cooking over the chimney. All the components can be stored inside the kettle.
While the Base Camp might be too big for backpacking, there is another model, called the Trekker, that holds two mugs of water. Combined with the cooking rack, that seems like it would be an ideal combination of backpacking biomass stove and water purification system.
But that's something I don't intend to wonder about long. Christmas is coming, and I hope I find a Trekker and cook set under the tree for me.
Follow Me on Pinterest


Sign up for our Email Newsletter
Check out the video:

Sunday, September 9, 2012

Propane or gas: How to choose a lantern and/or stove fuel

Propane or gas? What type of emergency implement fuel is the best choice for you?
by Leon Pantenburg
Check out this Altoid tin survival kit kit with knife!
Click here to buy survival kits

Let's assume an emergency scenario where wood heat/light are not an option, you can't use a campfire and a biomass stove is out of the picture. Maybe there is extreme fire danger, open fires are prohibited, or there isn't a ready supply of fuel.
Should you have a propane or gas lantern or stove? Tank or canister? What are the advantages, disadvantages and what considerations should you be aware of?
My collection includes kerosene, gasoline and propane lanterns. The best  choice will depend on the situation, weight, safety and availability of fuel. (Pantenburg photo)
My collection includes kerosene, gasoline and propane lanterns. The best choice will depend on the situation, weight, safety and availability of fuel. (Pantenburg photos)


I can't make up my mind which fuel is best. I currently have one propane and four Coleman gas lanterns. I own a dual-fuel campstove, gas backpacking stove, and one small stove that screws on top of a propane cylinder. My go-to stove for all off grid cooking is a double burner Camp Chef propane cooker that uses bulk propane. I have a propane space heater for emergency warmth.
Your emergency preparations should include some thoughts about lighting, heating and cooking implements over the long term. Basically, your choices will boil down to two main categories: propane or liquid fuel (gasoline).
Before you buy anything though, consider where the appliance will be used. Are you car camping, where weight is not an issue, or backpacking above the tree line, where weight will be a major consideration? What temperatures will the item most likely be used in? How important is long term use and the ability to replenish the fuel?
Here are some shopping considerations:
Propane or gasoline? Where the appliance will be used, and the operating conditions will determine the best choice for you. (Pantenburg photos)
The propane cylinder has advantages over liquid fuel, but that  doesn't make it the best choice.
  • Convenience and ease of use:Does the fuel source affect how easily the implement can be used? There is no pouring, priming or pumping with propane. With gas, the implement must be filled, and sometimes primed and pumped. While the gas implement is operating, it will occasionally need to be pumped.
    Propane or gasoline? Check out the shopping considerations to decide.[/caption]
  • Fuel availability: The dual-fuel gas implements can use unleaded gasoline, at a fraction of the cost of Coleman fuel or white gas. I've bought Coleman gas at tiny little stores in out-of-the-way areas of northern Minnesota, where the store inventory was sketchy at best. Conversely, I've also seen standard 16.4 oz disposable propane gas cylinders at many of these same stores. I'm guessing gas is still easier to find, but bulk propane is also very common and cheap.
  • Cost: Last week at the local WalMart, the disposable propane cylinders were on sale for about $6 for two cylinders, versus almost $10 per gallon for Coleman fuel. The dual-fuel gas stoves and lanterns are the clear winners in the cost-effectiveness category, with unleaded gasoline from the pump costing about $4 per gallon. Not to mention, a dual-fuel implement can be re-fueled with a siphon hose from a vehicle gas tank.
  • Safety: As a Boy scout volunteer, I see safety around fire as paramount. I've noticed that the propane lanterns and stoves are easier, and hence safer, for the boys to light and use. There is no priming, pouring or fuel to spill. The idea of a container of gasoline anywhere near an open fire, with kids around, makes my blood run cold.
  • Implement design: My Coleman model 442 backpacking gas stove has a listed weigh of 24 ounces. That, in part, is due to the pump and generator required for a gas stove. My single burner propane stove that screws on top of a propane cylinder weighs less than half that.
  • "Green" design: I don't like the disposable propane cylinders - they work great, but it seems to be a terrible waste to throw away the empties. For a long-term situation, such as a lengthy campout, though, a bulk propane tank can be filled for about $2-something a gallon, making that option an economic favorite.
  • Temperature: Cold affects propane's effectiveness. In extreme cold, a propane cylinder may not work at all. Gasoline is not affected. That's one reason why I have so many gas-powered implements.
Like anything, the final decision on whether to invest in propane or gas appliances will depend on your individual needs and perceived usage. Good luck with picking a favorite - I haven't been able to come up with one yet!


The leadhead jig: The do-it-all survival fishing lure?

Is there a do-it-all lure for survival fishing? My money is on the plain lead head jig. Here's why.
by Leon Pantenburg
Check out this Altoid tin survival kit kit with knife!
Click here to buy survival kits

After my first week on the Mississippi River, I sent three fishing rods and a large tackle box home. After seven days of fishing and catching many walleye, smallmouth bass, northern pike, crappie and bluegills, I didn't anticipate needing anything but a medium-action, fast-tip, seven-foot spinning rod, a Mitchell 300 reel
The basis of a very effective group of survival fishing lures is the simple, leadhead jig. From top is a quarter, eighth and sixteenth ounce jig (Pantenburg photos)
with six-pound line and a box of spinners and leadhead jigs.
This selection served me well the rest of the way down the 2,500 miles of the river. I never went hungry because I couldn't catch a fish and my go-to lure was a 1/8-ounce jig, tipped with a three-inch yellow Mr. Twister. (To read the story, click on my end-to-end Mississippi River canoe voyage.)
When putting together a survival kit, you must to carefully weigh the value of the components. A common question is about fishing lures: Is there one lure that can catch everything?
First, though, remember that survival fishing is not sport fishing. If you must catch fish to survive, use the most effective method available, legal or not.
Hook and line sport fishing techniques may not be particularly effective in a survival situation. In fact, it may be a waste of really valuable time if you're fishing when a better choice might be to gather firewood, improve a shelter, or set up signals.
You also need to figure out the return on your calorie investment. If you must expend 300 calories to catch a fish that can only supply 100 calories, you're going to end up with an energy deficit.
So the choice of the best survival lure depends on the situation, location and water conditions. Talk to several fisherpeople and you'll probably get that many opinions.
My best all-around nomination is for the leadhead jig, and here's why:
Inexpensive: The jig is nothing more than a hook with a gob of lead near the eyelet. I pour my own, ranging in weight
These leadhead jig lures were improvised from available materials. The body in both are composed of wool yarn. The tail on the top lure is made of a marabou feather, and the bottom tail is part of a pheasant feather. Both these patterns are proven and effective.
These 1/8-ounce jig lures were improvised from available materials. The bodies in both are composed of wool yarn. The top lure tail is a marabou feather, and the bottom tail a pheasant feather. Both these patterns are proven and effective.

from 1/32-ounce to 1/4-ounce, in several styles. Several years ago, the guys in the print shop at the newspaper gave me about 20 pounds of old linetype lead. My jigs cost the price of the hooks, and whatever electricity it takes to run my melting pot.
You can buy bulk leadheads at any sporting goods store, and the bodies are so inexpensive, you can stock up on different colors, styles and sizes.
Versatile: I tip jigs with virtually anything, from plastic twister tail grub bodies, to hair and feathers. Since I hunt, I have a lifetime supply of deer, elk and squirrel tails, and the feathers from a variety of game birds. Depending on the species of fish and circumstances, I can make just about any type of jig necessary. Part of the fun of fishing is catching something on a homemade lure!
Effectiveness: The jig is designed to mimic a minnow, or represent some other food source. Sometimes, a properly-fished jig will cause a reflexive strike for a game fish. While I have a tackle box full of various lures, I generally start out with a jig, and seldom have reason to switch.
Color: Start out with a basic selection of black, white and chartreuse, and those colors will probably do the job. My favorite color on the Mississippi River was yellow. My top producer color on Oregon's John Day River is motor oil or brown. Black is always a contender. Experiment in your area, and you'll be able to dial in your color preferences.
This pocket-sized box holds all the lures I need for a day of smallmouth bass fishing on Oregon's John Day River.
Fishing technique for a jig can depend on the circumstances. The most effective method, IMHO, is to cast the lure out, and bounce it off the bottom. You will lose a lot of jigs like this, but if you aren't hitting snags or rocks, you aren't prospecting where the fish are.
Another method is a steady retrieve, with periodic twitches. A favorite panfishing method that also works well for steelhead trout is to attach a jig a few feet under a bobber or float.
Like any survival technique, the more you practice, the more effective you will be. And to be required to practice fishing...well, worse things can happen!